 Yes, it’s really true. You do not need a fancy camera to take great pictures. Trust me on this one. Yes, you have a lot more tools at your fingertips with a high end camera, but then there’s often a steep price tag and learning curve to go along with it. If that is your cup of tea, then go for it! But, if for some reason you find yourself wanting to take better photos, yet limited by budget, please do not despair. This blog post is for YOU.
 (Well, let me be honest – It would be great if my life could be like the Oprah show, or even the Pioneer Woman site, and you would now look under your computer chair and find a new DSLR from me. Or my sponsors. Whatever. But, I am not nearly so rich nor famous. Nor as good a cook. But hey, they had to start somewhere too, right?)
Anyway, since there is no camera under your chair….hey, there isn’t right? I mean, that would NOT be a safe place for a camera. Not in my house, anyway. So take a look and if you find one, get that sucker out of there pronto!
A little disclaimer – I do use professional gear (camera, lenses, hoods, filters, etc…) for most of my photography. And I do everything in Manual mode, from exposure to focus. But, I leave that beauty locked up at home when going to a waterpark, etc… where it could all be ruined or stolen. So, I took my little Sony Cybershot point and shoot with us on our recent excursion, and was really pleasantly surprised at how well it delivered.
 On with the post. Basically, getting some good pictures comes down to 4 things: Making the Most of Your Camera’s Preset Modes, Lighting, Composition, Post Processing, a Great Snack, and Good Coffee. Don’t complain. It’s not a math tutorial.
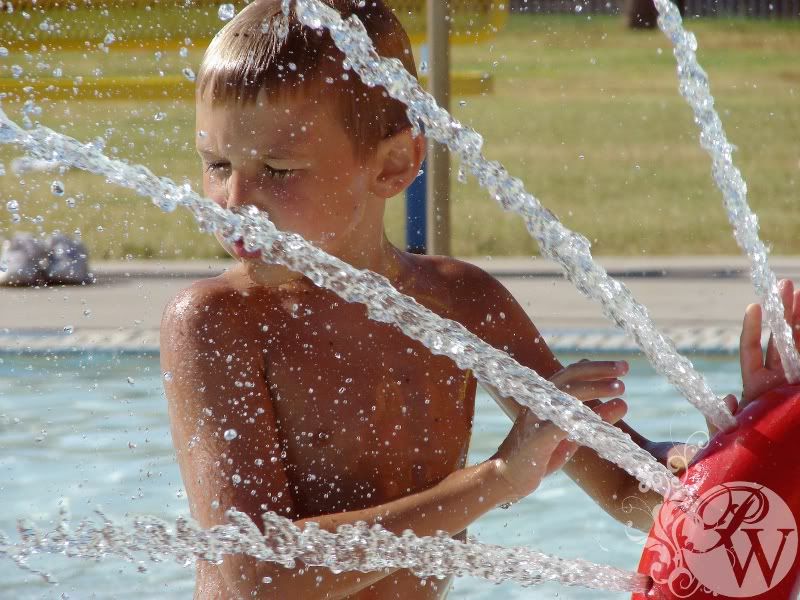
We recently went to a waterpark, and I took these pics late in the afternoon. With my POINT AND SHOOT. See. It can be done. And probably better than I will show you here. LOL! But my point is that I am so often asked about my camera, because people assume it’s the reason I take good pictures. And while it does give me a lot more control and capabilities, it is not THE reason my photos turn out well.
Another little disclaimer – there are probably 2,396,433 better and more complete tutorials than this. Really. But, if this gets you started on the road to discovering your camera can do more for you, I will feel glad to have done that for you. It is in no way meant to be a real course on photography, complete with talk about exposure, shutter speed, focal length, aperture, etc… Let’s think of this as the bare bones, no technicalities overview of how I get the most out of my point and shoot. If you want more when you’re done here, Google is your friend. Or leave a comment and ask me. I’m happy to point you to some great resources.
Point #1 – My point and shoot camera has preset modes, and I USE THEM. I never shoot with it in AUTO. I use portrait setting, action, etc… The shots in this post were all taken either in portrait or action mode. If you are taking a picture of a person, the portrait mode often uses a lens trick to place greater focus on the subject. And you cannot beat action mode for freezing motion. Look at the CRAZY water in the slide and sprayer photos! Point #2 -Lighting. Ideally you’d like to shoot in the morning or evening. But, you can’t always do that. Like, if you’re going to a waterpark. In the middle of the day. So, what do you do? Well, if you are taking pictures of people you love, as I was, then you want to get them when they are enjoying themselves, having fun, and most importantly NOT SQUINTING. I made a point to be on the shade side of all the play equipment, and shot from there. I watched the fun through the viewfinder click click clicked. (Which brings me to another point which I didn’t mention before, but even cheap digital cameras take FREE pictures. So keep snapping! You are bound to get some good ones. And occasionally, check the previews to make sure that what you think you are getting is coming through.)
I should probably take a second and mention stability here. I try to always adopt postures that lend well to holding the camera very stable, so I don’t deal with much camera shake. Elbows in against my body, or stabilized against something. Point #3 – Composition. Number 1 FAIL on composition comes from shooting way too much of the scene. What do you want a picture of? Do you really need to see the top of the lightpole and the fence and trashcan in the picture with your child? Maybe you want to get closer or zoom in on his face. Getting the camera at eye level is even better! I could talk about the rule of 3rds, or the Golden Section, but I promised I would not get technical. That’s what wikis are for, right?
 Point #4 – Post Processing. Sure, you can spend hundreds on Photoshop, but if you are shooting on a shoestring, then maybe you would also like a free editing program. Check out the Gimp. I never really realized how much more crisp and vibrant my photos could be before I delved into the world of photography. I’m not aiming for something that totally changes the photo. Just one that more closely conveys the image I saw when I snapped the shutter. You can Google for a bazillion tutorials on awesome things you can do with the Gimp, which is what I used to edit these. I did an “auto levels” for most of them, unsharp mask, and cropped 1 of them. But, it does tons more. So, check it out!
I hope you find even ONE THING that helps you take better photos in this post. Or, even from Googling. LOL! Why don’t you leave me a note with your favorite tip for getting great pictures with your point and shoot camera? I’d love to read it!